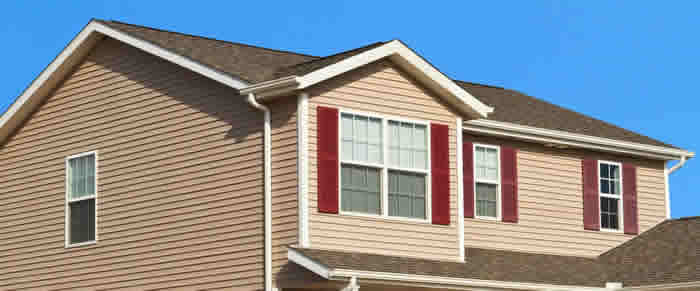
Vinyl siding is one of the easiest types of siding to install, but that doesn’t mean it doesn’t require skill or knowledge to complete properly. When incorrectly installed, vinyl siding will let water in, and it will become a lovely home for all sorts of pests—which won’t look very good either. Here are some tips to help you avoid the most common mistakes while installing vinyl siding.
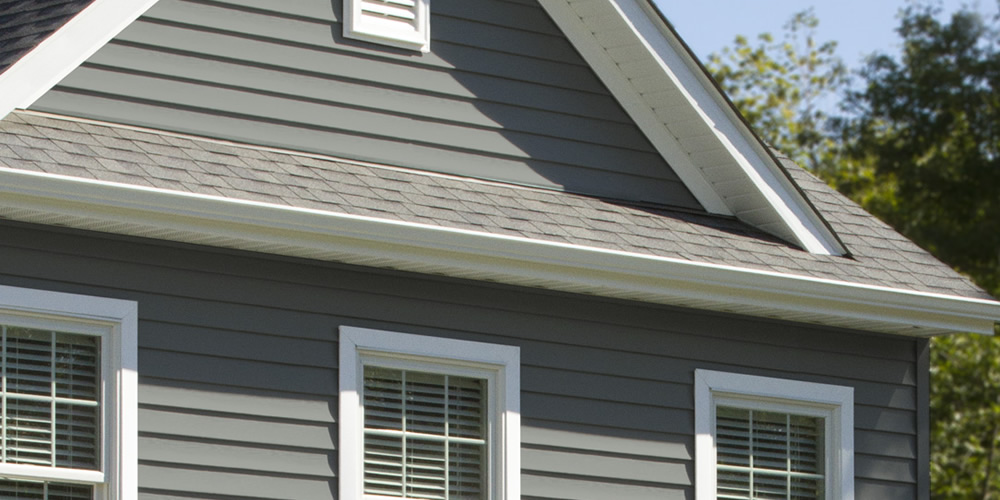
Consider a Wider Starting Strip
There are several options of starter strip available for starting vinyl siding. Most people are inclined to use the thinner starter to get things going because it’s more affordable—but this is a bad move. Spend the extra money and invest in 3-1/2″ starter strip. During your installation, make sure that at least 1″ of the starter strip hangs down over top of the foundation of the house, and drop it down as low as you can while installing the strip properly.
The more that the foundation is covered by the starter strip, the better the siding is going to protect the house against rain, snow, and anything else that nature throws at it.
Level it Out Carefully Properly installed siding needs to be leveled. Not only will it function better if it’s all leveled out, but it will go on more easily as well. When you first get going with the project, snap a level chalk line all around the base of your home where the first run of siding will go. This is to help get your installation straight. Then throughout your project, take the time to level things out about once every five courses to keep things going properly.
Leave Space on the Ends
Vinyl siding has to be able to move just slightly after it’s installed. For that reason, it’s important to cut your end pieces so that you have a total of ¼” of extra space together on both ends of your siding runs. This is to help with expansion during the summer months, to keep your siding from buckling and having other nasty problems along the way.
Use a Vinyl Blade to Make the Cuts
Don’t try using a standard fine-toothed saw blade to cut your vinyl sections. Instead, rely on a specialty vinyl blade. The blade arranges the teeth backwards so that the cut is smoother. This cuts down on chipping and other issues during standard cutting and makes the project go much more effectively overall. If you are needing help to install vinyl siding, Modernize has tons of reliable local vinyl siding installers waiting to talk to you today.
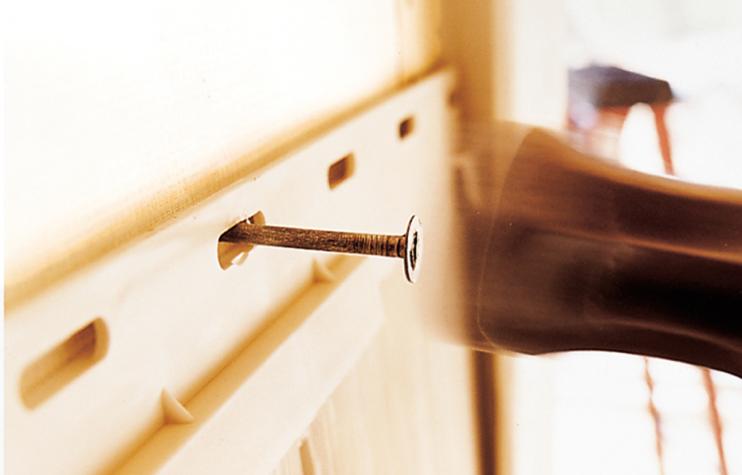
Lock Siding Down Loosely
It’s important that you don’t actually lock the siding tightly against the walls of the house. Instead, you should leave a gap between the head of the nails and the siding being locked down underneath them. This will allow the siding to move properly as it expands and contracts.
Lift and Nail
The last thing you want is for your siding to come apart after it has been installed. That’s why you should pull each piece up slightly as you are nailing it. As you go along, lift up the piece and then nail it into place. This helps to securely lock the pieces together and to create a sturdy bond between the sections of siding.
Choose the Proper Nails Select galvanized roofing nails to hold the siding firmly in place and to stand up to weather properly after the siding is installed. Make sure that they’re are at least two inches in length, but use longer nails if the siding is going over top of rigid foam instead of right up against sheathing. Make sure that the nails are galvanized or the weather will corrode them much faster than it should and you’ll be left with siding falling off your home.
Flash Window Bottoms Before you even get started with the siding installation, it’s important that you flash the bottom corners of each of the windows. To do this, you simply cut out a section of felt paper to fit right over the corner of the window and nail it in place with the roofing nails. Putting that small piece of roofing felt around each of the corners will help keep water from getting in behind the J-channels and rotting the framing around the windows. Instead, any water that gets behind the channels will roll down the flashing and then out on top of the existing siding—just make sure that the bottom of the flashing comes out over the run of siding just below it or it won’t work properly.
By keeping each of these tips in mind during your siding installation, you can improve the final results, cut your installation time down, and even improve the overall look of the finished product. The tips are simple, but important, and are key to getting the siding on properly.
Restoring historic homes requires strong attention to detail to maintain the elegance of the original structure. While most homes built in the late 1800s and early 1900s used wood siding, this particular exterior cladding requires regular upkeep and a new paint job every few years. As a result, maintaining the original beauty is a stringent process. That’s why many historic restoration remodeling contractors rely on the design versatility of vinyl siding to keep the charm and character in line with the home’s history.
VSI Certified Installers Maintain Historic Charm with Vinyl Siding
The VSI Certified Installers at Midwest Construction have been nationally recognized for their restoration work using vinyl siding and vinyl building products. Working with various styles of vinyl siding and gorgeous color options, that are resistant to fading and never need repainting, Midwest Construction can successfully transform a home’s exterior that will stand up to the elements, require a low initial investment, and result in minimal long-term maintenance costs.
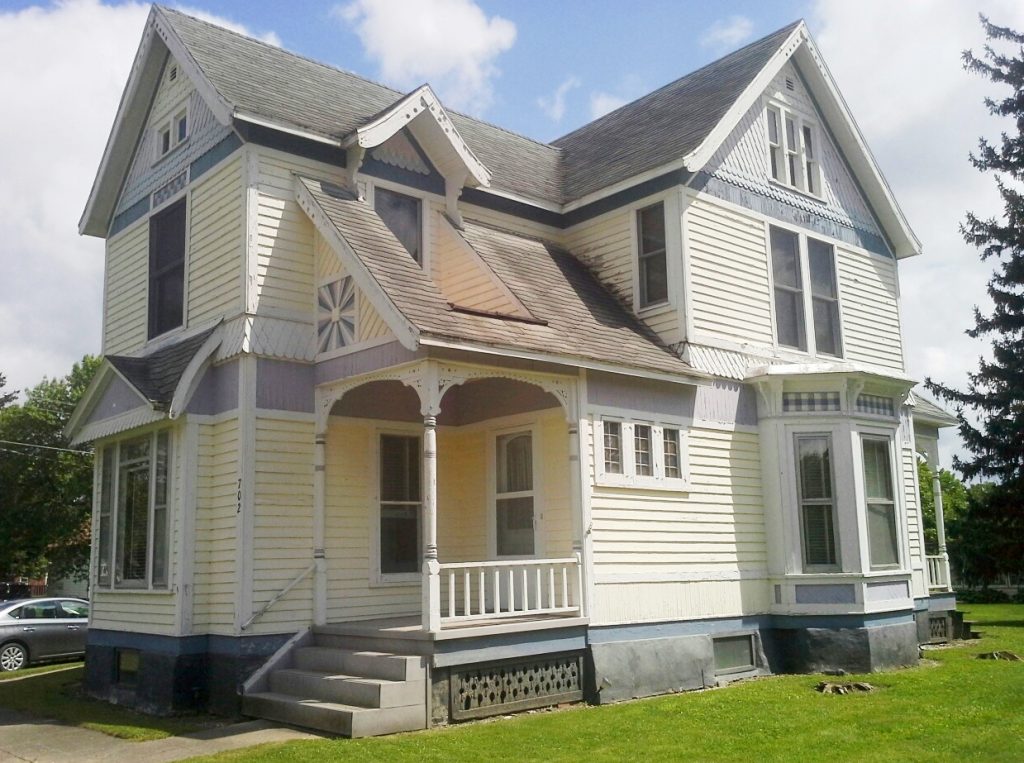
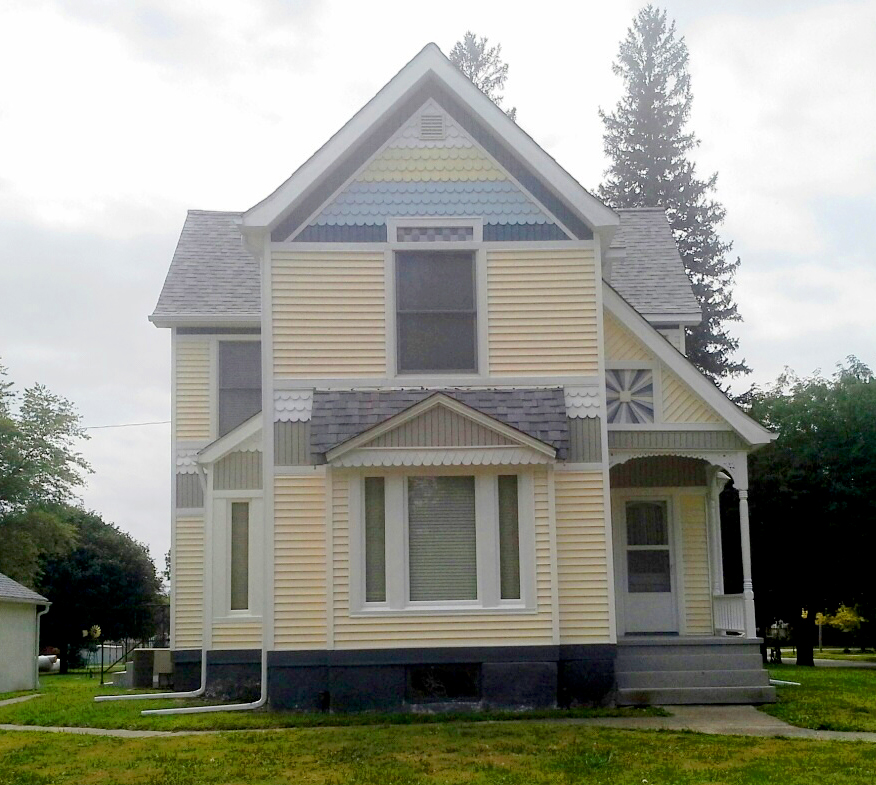
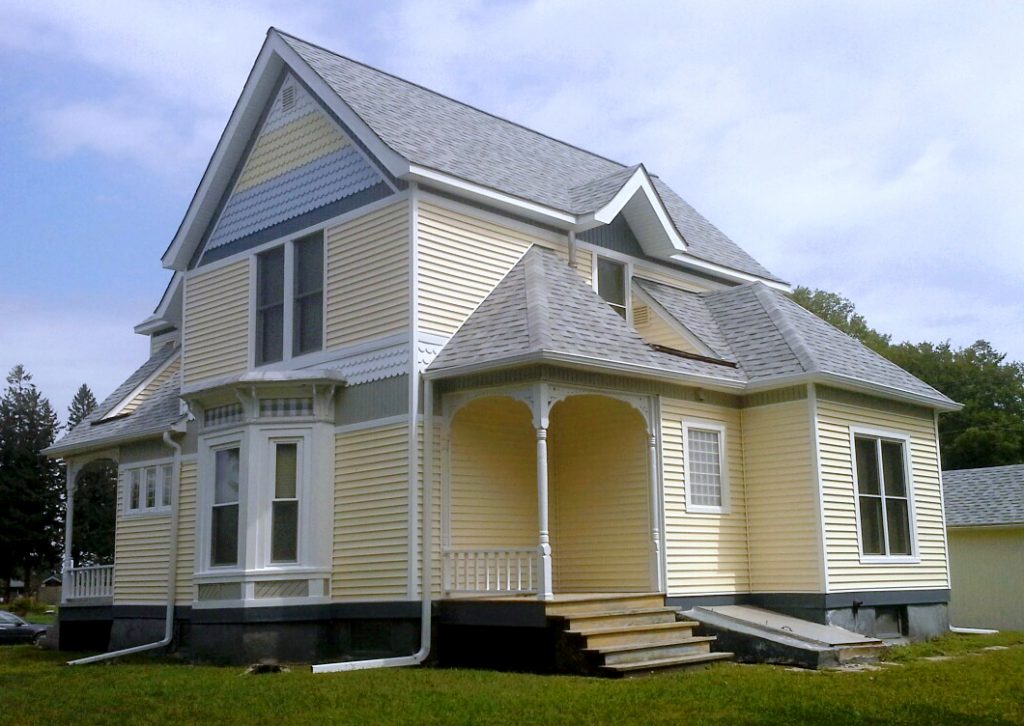
In their 1930’s era historic home restoration, they perfectly preserved the original look by replacing the rotting wood siding with durable vinyl siding. The yellow clapboard matches the original paint color and the blue, yellow, and white scallop detailing provides the perfect touch of historic charm. The homeowners are left with a nearly exact replica of their original 1930’s home, without the hassle of regular upkeep.
Before:
After:
How Vinyl Siding Replicates Historic Aesthetics
Remodelers regularly rely on vinyl siding when restoring historic homes because of the vast options available from both a cladding and accessories perspective. It’s often possible to imitate the original siding, maintaining the exact look of the original siding thanks to abundant lap sizes and a diverse color palette, with more than 400 certified colors that won’t fade over time.
Architecturally correct panels are available that so closely replicate the natural look of clapboard siding that even up close, it’s difficult to distinguish from real wood. Vinyl siding and accessories can be used for almost every aspect of the building construction, as well as decorative details such as trim, shakes, and scallops.
In addition, vinyl siding is the superior choice compared to the home’s original wood siding because of its minimal maintenance and upkeep. Unlike wood and fiber cement, which require regular painting, vinyl siding won’t rot, crack, or suffer insect damage. It can also be cleaned with mild soap and a garden hose.
Concentrated sunlight reflecting off certain surfaces — like energy efficient windows — and onto vinyl siding can create enough heat to damage the siding surface. While it’s not common, it is important to know how to protect a home’s exterior from heat-induced distortion.
With increased attention on cases of siding distortion, we’re committed to addressing concerns homeowners, builders, remodelers, architects, code officials, or the media. Below are answers to some of the most common questions about siding distortion.
What is Siding Distortion?
Siding distortion — sometimes described as “melted” siding — is caused by concentrated sunlight reflected from windows. In every case, the evidence is overwhelming and unavoidable that energy efficient windows are capable of concentrating and reflecting solar energy, which causes damage to a wide variety of materials.
How to Prevent Siding Distortion?
Damage to property caused by concentrated sunlight is infrequent and occurs only under a unique set of conditions. Homeowners can protect their personal property in such instances by blocking the path of sunlight, either to the window or between the window and the siding. This includes the strategic placement of trees, bushes, or other landscaping elements and the use of sunshades above windows. Screening applied to windows may reduce the total amount of reflected energy and help to avoid the problem.
Can Siding Distortion Affect My House?
The chances of siding distortion occurring on any given house are extremely small. Vinyl siding is the most popular choice of exterior cladding, and has been for about two decades. There are tens of millions of houses sided with vinyl. Only a tiny percentage of those houses have been affected by exposure to concentrated sunlight reflected from windows. A very narrow set of conditions needs to come together in order to cause the problem, and this happens very infrequently. If your house has not been affected in the past, it is not likely to be affected in the future. This can change, however, if windows are replaced (either on your home or your neighbor’s) with ones that are more likely to concentrate the sunlight, or if something that blocked sunlight is removed.
How close to the window does the vinyl siding need to be in order to be affected by the reflection?
It is not possible to predict what distance is at greatest risk or whether there is a “safe” distance from the window. This is a topic of on-going research. The range or “zone” of distance from the window in which the reflected beam is most concentrated depends mostly on the curvature of the glass. The curve can be different for different windows, and can even change in the same window under different temperature and atmospheric pressure conditions.
Is the damage from solar reflection and heat distortion limited to vinyl siding?
No. Other materials can be raised to temperatures known to cause short-term or long-term damage from exposure to intensely concentrated sunlight. Anything that falls in the path of that reflected beam can be harmed including cups, bags, pool covers, car parts, painted surfaces, and cedar shingles are a few of the materials reported in the media to have been damaged. People who have found themselves in the path of such beams of have reported extreme discomfort and the inability to remain exposed for more than a few seconds without enduring the risk of burns. Eye damage from even a brief exposure is highly likely.
Does this happen only in the summer, or only in hot climates?
The phenomenon can occur anywhere the sun shines, in any season. Even when the air is cool in winter, if the sun’s energy is concentrated onto a small surface area, that location can become far hotter than the surrounding area. But in many cases the relationships of the angle of the sun, the direction of the window and the location of the house wall are “just right” only at certain times of the year.
Can the high temperatures created by concentrated sunlight set my siding on fire?
No. The ignition temperature of vinyl siding is approximately 720-750 °F (380-400 °C). This is well above any temperatures reported to have been caused by even the most extreme cases of concentrated sunlight reflected from windows. In fact, the ignition temperature of wood is lower than that of vinyl siding, so wood materials such as siding, fencing or decking would be at greater risk of ignition than vinyl siding.
Does the heated vinyl siding release dioxin or other chemicals?
When vinyl siding is distorted by the heat, the vinyl siding is changing shape, but does not break down or release toxic chemicals at the temperatures reached in reflected sunlight cases. The combustion and other conditions necessary to create dioxin do not occur with reflected sunlight.
Does lighter-colored, thicker or more expensive siding resist these high temperatures better?
No, the thickness, color, or “quality” of the siding are not likely to be major factors. Many of the conditions that affect the risk of distortion from concentrated sunlight are still being studied. Concentrated reflected sunlight has caused distortion of light and dark siding, and even the thickest and most expensive profiles. These factors may make relatively small differences in the occurrence of distortion, but their effects are overwhelmed by the large amount of energy transmitted in a beam of concentrated sunlight. Effective solutions must involve preventing the windows from concentrating the reflection, or by intercepting or diffusing the beam before it strikes the siding.
Does the type of material behind the siding—such as a light, dark or shiny underlayment—affect the likelihood of distortion?
No. Based on current laboratory research and field observation, there’s no evidence that the nature of the underlayment has a significant effect on distortion.
Is this kind of distortion covered by the siding manufacturer’s warranty?
The terms of each siding manufacturer’s warranty are likely to be different, so you should refer to the warranty for the specific product. Warranties generally cover manufacturing defects that lead to unacceptable performance under normal conditions for the intended use. Damage caused by excessive or abusive conditions are not normally covered by warranties. Thus while temperatures created by normal environmental conditions, including exposure to the sun, would fall within most warranty terms, the excessively high temperatures caused by a fire—or by unnaturally concentrated sunlight—would not. But, follow up with the siding manufacturer to determine the specifics.
Look beyond the never-to-be-settled debate over siding’s merits/sins. It’s an affordable, energy-conscious update. It can even look good.
By Mark Feirer of This Old House magazine
The Benefits of Vinyl Siding
There are few subjects in the whole arena of residential construction products that draw battle lines as sharply as vinyl siding.
Proponents harp on the fact that it never needs painting, while its detractors insist that houses should never be covered with anything but real wood.
As a building material, vinyl siding is relatively new — it was introduced in the late 1950s as a substitute for aluminum siding. But its reputation was tarnished in the early days when it cracked, faded, buckled, and sagged.
Ongoing changes in the product’s chemistry and installation techniques have improved its performance and furthered its acceptance by builders and homeowners.
In fact, vinyl has captured 32 percent of the U.S. siding market for new homes, with no end in sight to its growing popularity. The reason, in part, is because it’s often (but not always) cheaper than red cedar or redwood and takes less time to install.
A mid-grade vinyl costs about $1.60 per square foot to install, not including the necessary trim pieces, while the installed price of mid-grade cedar clapboard, exclusive of trim and paint, is about 2.5 times higher. (Some premium vinyls cost about the same as the best grade of cedar, but the installed cost is still lower because it goes up faster and doesn’t need painting.)
For many people, price isn’t the issue at all; the real seduction of plastic siding is reduced maintenance. That’s exactly why a wood guy like This Old House general contractor Tom Silva put vinyl on his house 20 years ago.
“I don’t have time for painting,” he explains. “I’d rather spend weekends on my boat.” Of course, with the right maintenance, wood will last indefinitely. Vinyl can’t match that claim because no one knows for sure how long it will last.
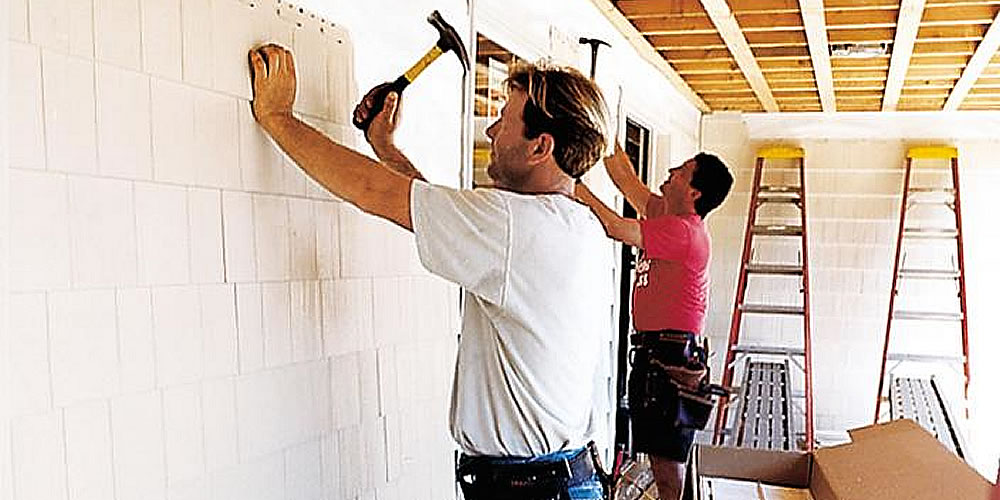
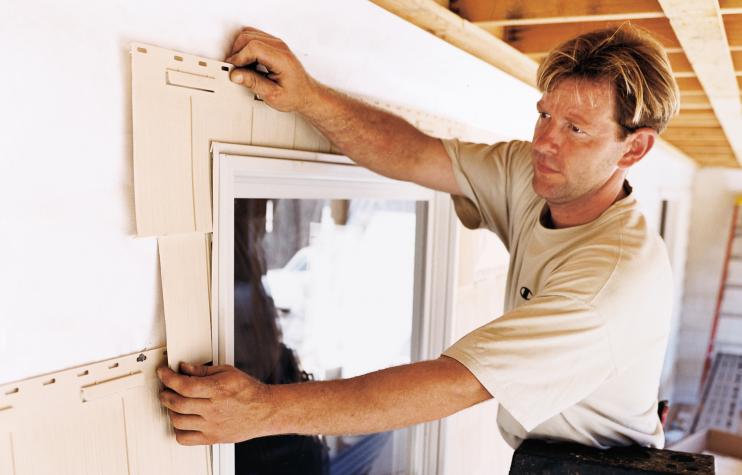
Installer Joe Fagone slides a cut-to-fit, 4-foot-long panel of embossed-shingle siding around a window.
All Plastic Siding is Not the Same
Vinyl is a polymer formed during a chemical do-si-do between ethylene gas and chlorine, which produces a fine white powder called vinyl resin. When it’s melted and mixed with different additives, the resulting compound can be as rigid as pipe, as supple as a shower curtain, or durable enough to survive the heavy foot traffic on a kitchen floor.
New, so-called virgin vinyl siding has a greater complement of the key additives that impart flexibility and resistance to UV degradation. Some manufacturers will tout their product as 100 percent virgin (along with a mention of its supposed superiority), but most siding is made with a core of remelted vinyl top-coated with virgin material.
Typically, vinyl siding is extruded through a die, but to produce the deepest patterns and crispest edges, panels must be molded from polypropylene, a more expensive plastic. Molded panels are typically no more than 4 feet long, while vinyl extrusions can be virtually any length.
Rap on a vinyl-sided wall with your knuckles, and it will flex and sound hollow. That’s because, in most cases, only a relatively small area of a vinyl panel is actually resting against the sheathing.
A thin panel, or one without support, is more likely to sag over time. The thinnest siding that meets code is .035 inch thick. Premium siding can be .044 to .048 inch, and a few manufacturers sell .055-inch siding. The thicker sidings tend to be stiffer, and therefore more resistant to sagging, but stiffness depends on other characteristics as well.
Panels with a folded-over, doubled nailing hem and a relatively deep profile tend to be stiffer than others, as do those with narrow “clapboards”: The more bends the better. Although claims are made that thicker siding is also more impact resistant than thin siding, test results suggest that it has more to do with its chemical makeup, which, unfortunately, is not available to consumers who want to compare products.
Thinner, less-stiff sidings can also be sucked off a house when high winds blow. Reading the manufacturer’s warranty should give you a good indication of the product’s ability to handle heavy weather. Some even comply with the 146-miles-per-hour wind code in hurricane-prone Miami, Florida.
One siding, Wolverine Millennium, comes with a “won’t-blow-off” warranty, and its literature states that it will withstand 180-mph winds, when nailed properly.
A panel of polypropylene siding slips into a grooved “corner board” of the same material. Panels expand and contract with temperature changes and shouldn’t be installed tight to trim pieces.
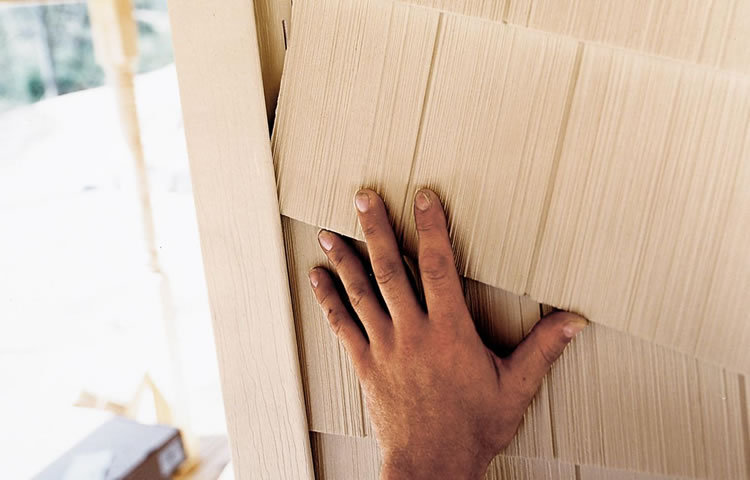
While wood siding is fastened tightly to the house, vinyl siding literally hangs from nails driven through horizontal slots at the top of a panel’s nailing hem. The reason for the loose nailing has to do with the vinyl’s (and polypropylene’s) need to expand or contract as the temperature changes: A 12-foot length of plastic siding can expand as much as 5/8 inch with seasonal temperature swings. If nailed tight to a wall, it can buckle on hot days.
“The worst thing you can do is nail vinyl tight,” says Tom Silva. To ensure that the panel is free to move, the nailheads shouldn’t contact the hem, but should be left about 1/32 inch proud. Conversely, if nailed too loosely the panels will rattle noisily whenever the wind blows.
Vinyl’s tendency to move means that panels can’t be butted tight to trim, either. Quality-conscious installers leave about 1/4 inch of clearance (3/8 inch in temperatures below 40°F) at the end of panel courses; at corners and door and window openings a trim piece called J-channel covers and conceals the resulting gap. Other proprietary trim pieces, made by manufacturers to fit their own brand of siding, include soffits, rake boards, and crown moldings. All help to improve the appearance of an installation, giving it a more custom look.
In addition to J-channels, one characteristic that distinguishes vinyl from other siding is its overlaps. While lengths of wood (or cement) siding meet in an unobtrusive butt, vinyl panels must be overlapped by about 1 inch wherever they meet, resulting in telltale vertical lines. The thicker the vinyl, the more obvious the overlap. Compounding the problem, most vinyl siding panels are molded to represent double or even triple widths of clapboards. This slashes installation time dramatically, but it also makes panel overlaps even more visible. A good installer will orient overlaps away from dominant views, for example, by running the siding from a back corner to a front corner. On the front of the house, panels should be installed so seams are least visible to someone approaching the front door.
Contrary to what many people expect, vinyl is actually less likely than wood to trap moisture, Tom says. “There are tiny weep holes in the butts of the panels. And because it’s hung loosely, air can move behind it.” Just make sure your siding contractor first installs flashing and either housewrap or builder’s felt, just as he would under wood siding.
Every quality vinyl siding job starts with the contractor. Dont hesitate to ask potential installers for their certifications — most of the large manufacturers certify installers in proper installation techniques — and for the names of satisfied customers. Also check complaint lists established with local and state business associations, as well as with state contractor licensing boards.
Siding is nailed loosely through horizontal slots in the hem at the top of each panel. Tightly nailed plastic siding can buckle on very hot days. The L-shaped clip under the nailing slot hooks into a channel in the butt of the panel above.
Not Entirely Maintenance Free
To keep vinyl siding looking its best, it should be washed periodically to remove the mold, mildew, dirt, and chalky oxidation that collects on the surface. Tom uses a soft-bristle brush and a bucket with a 30/70 mix of vinegar and water. (If that doesn’t do the job, the Vinyl Siding Institute suggests mixing 1/3 cup laundry detergent, 2/3 cup powdered household cleaner, 1 quart liquid laundry bleach, and 1 gallon water.) He just brushes it on, working from the bottom up, and gently hoses it off. Tom discourages homeowners from using a power washer on their siding; the high-pressure equipment is likely to drive water behind the panels.
Repairing a damaged panel is simple. With a zip tool and a flick of the wrist, Tom simply unhooks it from the ones above and below, then pulls out the nails. A new panel can then be snapped in place, nailed, and re-hooked. The biggest problem is matching the replacement to the surrounding pieces, which will undoubtedly have faded. “What I’ll do,” Tom says, “is replace the damaged piece with some siding from a less conspicuous part of the house.” Then he replaces that piece with the new, unfaded length.
All vinyl siding will fade somewhat. After 10 to 15 years, the change can be significant. When that happens, or if you simply want to change its color, vinyl can be painted, as self-defeating as it may seem. (Check with the manufacturer first; many companies void the warranty if siding is painted.) Wash the siding first, and use latex paint, which will flex with the vinyl’s movement. But don’t count on changing a pale-yellow house to hunter green; dark colors absorb more heat than lighter ones and can cause panels to expand too much and buckle. (For that very reason, vinyl’s color palette is limited to lighter shades.)
Tom is well aware of the fact that plastic siding draws strong opinions from his clients. “It’s pretty hard to convince someone who wants vinyl to use wood siding instead, and vice versa,” he says. “Some people like it and some don’t, just as some people like Fords and some prefer Chevys.” Whether vinyl siding is good or not depends a lot on the quality of the product and the installation job. “Would I put it on my house again, if maintenance issues weren’t a factor? Probably not,” Tom says. “I really prefer wood.” But he really, really doesn’t like to paint.
Plastic siding is quick to install. The seven-man crew from Hansen Home Designs trimmed and sided this 3,200 square-foot house in less than two days. Photo taken April 4, 2002.
Re-siding with Vinyl
Much of what appeals to us about older historic houses, apart from their architectural style, is the graceful moldings, well-proportioned trim, subtle shadow lines, even the slight irregularities in the spacing of the siding — testaments to the skills of this country’s housewrights. But in countless slipshod re-siding jobs, where vinyl is slapped up over the existing shingles or clapboards, these details have been obliterated, making the facades of handsome gingerbread houses as plain as sheet cakes. “I’ve seen a lot of cases where they’ve sawed off moldings, window trim, cornices, even knocked them off with hammers,” says Tom. “It looks worse than terrible. And it takes away what makes old houses special.”
For those contemplating having a house re-sided, Tom recommends finding a contractor who specializes in old-house work, not just in vinyl siding, and insisting that all the architectural details remain in place. “Run J-channel around them and butt the siding into it,” he says. “Of course, it takes more time and money to do it this way.” A proper paint job may make more sense, if that’s the case. Sometimes, re-siding jobs are sold as a way to “tighten up” the house and reduce energy bills. The installers simply nail up a layer of foil-faced foam before the vinyl goes up. Tom doesn’t think much of this practice. “The foam panels are only 3/8 inch thick; they don’t add much R-value,” he says. “You’d be better off packing the walls with blow-in cellulose.” The final word: If you have any doubts about its effects, don’t put vinyl siding on your old house.
Durability for one. The homes you design should stand the test of time and Mother Nature. Vinyl siding, insulated siding, and polypropylene siding are the only claddings certified to international standards and verified by an independent quality control agency. Our products do not fade. There are more than 400 products certified for color retention. And all certified products will withstand extreme weather events; they are tested to
withstand winds of 110 mph (most products achieve much higher ratings);
weather the effects of our hottest summer days, coldest winter nights, and torrential rains;
lie flat on the wall and not buckle;
withstand impact; and
meet manufacturers’ advertised specifications for length, width, thickness, and glass.
Vinyl siding, insulated siding, and polypropylene siding are part-and-parcel of a weather resistant wall envelope; these claddings are hung on the wall assembly, creating a de facto drainage plane and vented clear airspace. In certain climate zones, this eliminates the need for an additional vapor barrier — on average saving approximately $500 per home. And, as you know, polymer-based sidings do not absorb water whereas fiber-based products may disintegrate over time when moisture penetrates the plank.
Designing green? Today’s vinyl siding delivers recognized environmental benefits throughout its life cycle — manufacturing, transportation, installation, service life, and waste management. Vinyl siding performs better than any other cladding, except cedar, according to a life cycle assessment conducted by an independent third-party. Vinyl siding requires less water and energy to manufacture per square than fiber cement and less than half the energy and fuel necessary to manufacture brick and mortar. Vinyl siding even beats cedar siding on ecological toxicity. Vinyl siding can
Designing for energy efficiency? Insulated siding reduces thermal bridging by blanketing the studs on the exterior wall — keeps heat in the home during winter and out in summer. Insulated siding is included in the 2015 International Energy Conservation Code among the materials that can be used as continuous insulation outside of the building framing cavities to provide the required total wall R-value for buildings in the coldest climate zones.
Insulated siding is recognized now accepted as home insulation in various energy efficiency programs — including the checklist of building products or methodologies that can help meet the requirements under ENERGY STAR Qualified Homes Version 3. Certified insulated siding must meet or exceed an R-value of at least 3.
Vinyl siding is designed to sell. It is the #1 cladding on new single family houses construct every year (and has been for more than two decades). From the humblest Cape Cod to the most luxurious Queen Anne, vinyl and polypropylene siding, trim, and accessories get the job done.
An inch is an inch is an inch. Or, so you’d think. But when it comes to measuring the square footage of a property, it’s not quite that simple.
I doubt there exists a buyer in the entire world of real estate who hasn’t asked, at one time or another, what is the square footage of a particular property. The fact is, however, measuring the size of a home isn’t an exact science.
You can hire three different appraisers to measure the same house and they may come up with three different measurements. Because there are multiple ways to measure and different mechanisms used, the physical act of measuring can be done differently. Some appraisers will measure square footage with a good old measuring tape, albeit a large one. Others come equipped with those new state-of-the-art laser devices. I have been present when an appraiser will just eyeball a difficult-to-measure space or even do the wide-arm measurement. The point is, there aren’t any universally applied standards.
What does this mean for sellers and buyers?
Sellers: Avoid providing square footage whenever possible and always add a disclosure
I once represented a client with a $2.5 million home for sale in San Francisco. Against my wishes, the sellers insisted I list the square footage in all of the marketing materials as 3,450 square feet. They showed me a copy of the floor plan and recent drawings from an appraiser. I reluctantly agreed to add the square footage and supplied the appraiser’s drawing and measurements with the property disclosure statements. I added my own disclosure, stating that square footage is not an exact science, that the number should not be relied upon as fact, and that multiple appraisers may measure multiple ways.
We received an offer. The buyer had all of their property inspections, reviewed city reports, and signed off on all the disclosures. Their agent came back when it was time to release the loan and appraiser contingency. The appraisal came in 30 square feet less than the seller’s appraisal.
Because of the discrepancy, the buyers wanted a $25K credit off the purchase price. The home had not gotten any smaller since the buyers first wrote their offer. Yet the buyers felt that the home was misrepresented; that they wrote an offer thinking it was something it was not. The seller ended up having to knock off $25K just to get the deal done. I believe that the buyers still would have written the offer, and for the same price, had we not listed square footage.
Dozens of lawsuits make it to court, and tens of thousands of dollars are spent arguing over as little as 50 square feet. That’s why my advice to sellers is to avoid listing square footage when possible. I know you want everyone to know how big your house or condo is, and you want every last piece of space to be included. However, as in the case of the seller who had to forfeit $25K, doing so can come back to haunt you. Buyers are coming to your home because of its location, price, number of bedrooms, bathrooms, parking, and the pictures and description they read online. If you leave out square footage, they are still going to come.
If you must market your property’s square footage, include a reference for your information, such as an appraiser’s estimation. For example, position it along the lines of “per tax records (or per a recent appraisal), the square footage is approximately xxx.” Also, don’t include illegal spaces, storage space, or the garage in your measurements.
Often times, without mention of square feet in any of the marketing remarks, buyers will turn to city tax records for that information. These numbers often neglect previous renovations, expansions or improvements. In the case of new construction, in some markets, these records are pulled from architectural drawings done by the developer, and submitted to the city before the property is built. This is often considered a “walls out” measurement, meaning the footage includes all of the space to the exterior wall.
As a result, a buyer they may think their potential new condo is 1,600 sq. ft. because the “city says so.” But when the appraiser comes inside the condo to measure, he’s usually using a “walls in” measurement — which often yields a square footage lower than what the architectural drawings state. Depending on the size of the home, the space between those walls can add up.
Buyers: Never take square footage at face value
Buyers want to know the square footage of a home they are interested in. They want some idea of the size of the house they’re serious about. They want to know exactly how much house they’re getting for the money. But these numbers should be used only as a reference point. A buyer should never make their home buying decision based on square the square foot of a home.
There are some situations, such as buying in a larger condo building (especially newer construction with identical finishes), when buyers are particularly interested in the price per square foot. They want to know this in relation to comparable sales. In these and other scenarios, my advice is to take square footage information with a grain of salt and don’t get too hung up on it.
A successful Realtor I worked with in San Francisco used to respond to buyers’ “what is the square footage” question with, “I haven’t measured it. Does the size of the house seem to work for you?” Her point was that a buyer either feels like the space is right or not, and that feeling is more important than a figure that may or may not be real.